
How to Deposit
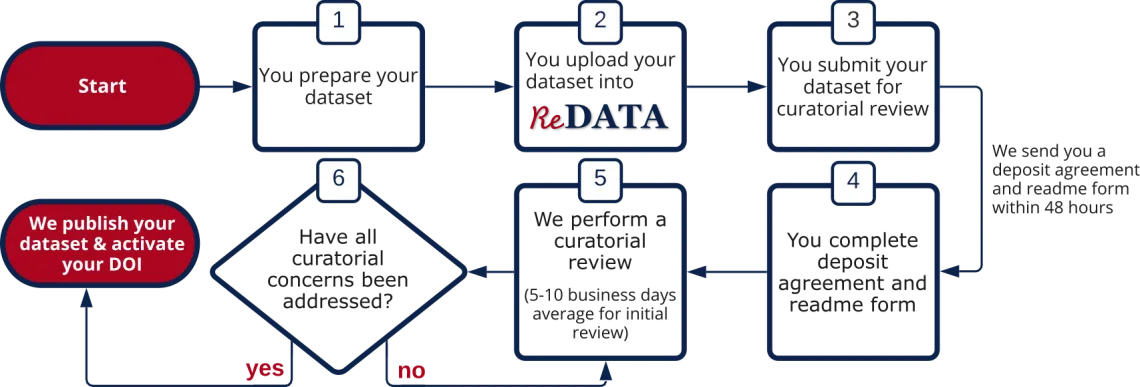
Publishing materials in ReDATA is similar to publishing a paper: you prepare your materials according to our guidelines, after which you submit them for review. After an iterative review process, your materials are published.
Refer to the deposit checklist for the complete set of steps to submit and publish your dataset. Briefly,
- Log in to ReDATA and click the "Create new item" button under the "My Data" tab to create a blank dataset
- Prepare your data according to the deposit guidelines, upload your files to the blank dataset, and complete the required metadata fields
- You may save the draft and reserve a DOI at this time (the DOI will be inactive).
- Submit your dataset for review
If the default storage quota is insufficient for your needs, please submit a quota increase request from within ReDATA or by contacting us. Refer to our quota policy for more information.
Deposit Guidelines
These general guidelines will help you prepare and organize your submission to help ensure a quick and smooth publication process.
Types of Materials Accepted
- Data files in any format (formats that do not require proprietary software to read are preferred)
- Software source code and executables (we strongly recommend consulting with TechLaunch Arizona prior to publishing potentially commercializable software)
- Refer to ReDATA's restrictions for what kind of data cannot be uploaded
In all cases, you must be the creator or have permission from the creator for us to accept your materials for publication.
File Organization
- Files should be clearly named so others can understand their contents. Be descriptive and consistent. See File naming best practices.
- Any file complex/non-obvious file names conventions must be documented. If not provided, we will request this information during our curatorial review
Folder Organization
- Uploading folders is allowed. See Folder structure best practices.
- If your dataset has more than 1 or 2 folders or 3 or 4 files, please place them in a Zip or other compressed file format. This makes the dataset much easier to handle and saves storage space.
- If collecting files/folders in Zip files, use one ZIP file per downloadable "chunk" of information. How to group data is up to you. For example, if your dataset contains three folders, Data, Code, and Figures, you could create three zip files: Data.zip, Code.zip, Figures.zip. That way, each part of the project can be downloaded separately without having to download everything.
- Complex folder structures must be documented. If not provided, we will request this information during our curatorial review
Software Source Code
- Ensure all files referenced in any analysis scripts are included in your submission (or it is documented where those files may be obtained)
- If using hard-coded input file names in the source code, we recommend using relative folder paths instead of absolute paths
- If distributing any dependencies, ensure the license allows redistribution
- Ensure you have the rights to distribute the software, or if you created it yourself, apply an appropriate license.
Metadata
ReDATA has various metadata fields. The following guidance will aid you in completing them.
- Title: Select a descriptive title for the dataset
For datasets associated with publications, we recommend the format Data for "insert title of associated publication." Example: Data and Code for "Beyond greenness: detecting temporal changes in photosynthetic capacity with hyperspectral reflectance data."
For datasets not associated with publications, we recommend selecting a title that describes what it is and includes temporal (dates, date ranges) and/or geospatial information, as appropriate. Example: Survey of Carbonyl Sulfide in Soils at 38 Sites in Europe.
Description: Add a short abstract describing the dataset
While you may add as much detail as you wish, if the details are extensive, we recommend adding them in a separate readme (e.g., the README form we send you).
License: Select an appropriate license for your materials. The default is CC By 4.0. See the License Selection Matrix for allowable licenses and information on each. If different parts of your deposit have different license requirements (e.g., if you are depositing both data and code), you have two options
(a) Create two separate deposits, each with its own license. We can link them together in ReDATA upon submission. This is option is recommended if the code needs to be cited separately from the data.
(b) Create one deposit and set the License field in ReDATA to the license of the primary item (e.g., data). You can note the license of the other item (e.g., code) by entering the information in the Readme form we send you. This is the easier option.
Funding (optional): Enter the grant number/name or other funding source
If your funding source is a federal grant, you may enter the grant number and it will auto-complete. Free text is also permitted.
- Preview thumbnail (optional): You have the ability to upload a custom thumbnail to represent your dataset. This image will appear on the main ReDATA page. If you do not upload an image, one will be generated for you (if possible).
Documentation
- If you already have developed documentation for your dataset, please include it. Examples of documentation include readme files, user manuals, codebooks (e.g., Jupyter notebooks), flowcharts, etc. See Data Documentation for help with what kind of information to include. If documentation is for specific parts of the dataset, be sure to indicate which parts/files/folders the documentation is for, either by indicating it within the file or by naming the file appropriately (e.g., README_software.txt).
- If you include your own documentation, we will merge it with the README.txt that we generate for you upon completion of the readme form.
- If you include your own documentation, we will merge it with the README.txt that we generate for you upon completion of the readme form.
- Regardless of whether you include your own documentation or not, we will generate a standardized README.txt for you based on a form we send you after submission